Using MeshCAM For Your First 3018 CNC Project
Hello! Before we jump in, I’d like you to know that my name is Alex. I somehow got Pat and Brian into drones, and later electric vehicles. I’ve slowly persuaded them to get Prusa 3D printers (It worked!) and now Pat has passed the CNC bug onto me. I hope you enjoy this article, as it will be the first of many that I write for Butter, What?!.
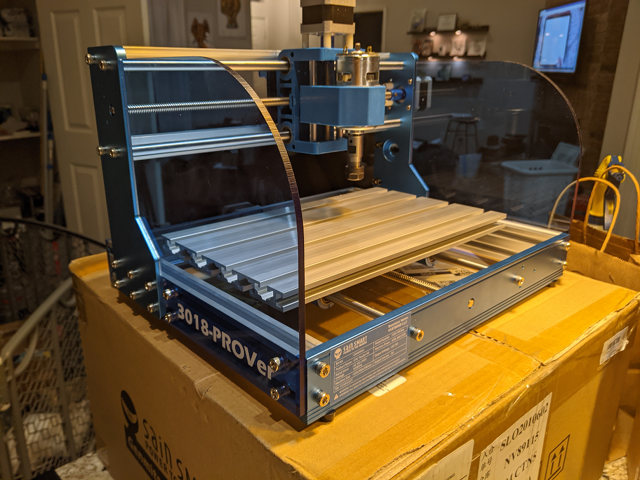
I just bought a 3018 Prover from SainSmart on Amazon. It was kind of an impulse purchase, as I’ve always been eyeballing the fun possibilities that could come from a small desktop CNC machine, but I was set on mastering 3D printing first.
Long story short, after three 3D printers (Monoprice Mini, Prusa i3 Mk2.5, and an Anycubic Photon), I can now say that I have a good understanding of the possibilities that these tools can offer me creatively without investing large monetary sums into more professional 3D-printing technologies. On to the final frontier! No, not space, but CNC machines!
So after a few dozen hours watching YouTube reviews on the SainSmart Prover 3018 CNC machine, I decided to pull the trigger.
This post is not about my review of the machine, but more on how YOU can save lots of time, effort, frustration, and maybe money by getting started in the right direction.
- MeshCAM at GRZ Software
- SainSmart 3018 Prover CNC at Amazon
- I Bought a CNC Machine: I Have No Idea What I’m Doing
MeshCAM
To understand how awesome MeshCAM is, we have to first look at the traditional CAD to CAM workflow. CAD refers to software that helps you design 2D or 3D objects, usually with the focus on product design. CAM, on the other hand, refers to software that assists with actually manufacturing 2.5D or 3D objects. If you are familiar with 3D printing then you might say “Alex, that’s what a slicer is! You know! Like Cura, Slic3r, or PrusaSlicer?!” And I would say “Exactly.”
The problem with CAM for subtractive manufacturing, that is when you are taking away material instead of adding it, is that it is inherently violent, AND there are different tools to deal with different materials. The way you cut into wood differs greatly from cutting into stainless steel or acrylic. With 3D printing, you are melting plastic, and the only variables are a variance of how fast you move the extruder, and how hot the extruder is.
This can be somewhat related to the CNC terms speeds and feeds. This means how fast your cutting tool is spinning, and how fast you are pushing it through a given medium like wood or metal. This can also differ on the shape of a tool, the size of the tool, how your machine is built, and the material that you are machining.
The takeaway here is that speeds and feeds will be different for practically every project, part, and piece that you machine. So now you might say “OOOOOOHHH that’s why any CAM software I’ve looked at is so complicated.” And I would say “Exactly.””
So is this where MeshCAM comes to save the day? Yes. Most popular CAM packages need to use either a combination of 2D shape data, or a parasolid 3D file like one from SolidWorks or a .STEP file. This makes things difficult when you are used to printing all those cool models from Thingiverse. Most subtractive CAM software just does not support direct STL file imports and the work to convert STL data into STEP data is enough of a process for an entire additional post.
This is where MeshCAM comes in. MeshCAM allows you to import STL files natively, and lets you define your stock (what type of material you are using) your tool library (the different endmills you have purchased) and even lets you scale and rotate the STL file just like your slicer does for 3D printing.
Now the best part of MeshCAM is that you simply create a roughing and finishing tool path and you are ready to machine! It really is that simple. This is what sets it apart from other CAM software packages. And if you need more than simple automatic tool path generation like 2-sided machining, global cut parameters, 2D operations, or tool path simulations, they have that too! I’ve tried about 5 different CAM packages, and for the possibilities that the 3018 can offer, MeshCAM is more than enough.
- MeshCAM at GRZ Software
- SainSmart 3018 Prover CNC at Amazon
- I Bought a CNC Machine: I Have No Idea What I’m Doing
How do I get started, Alex?!
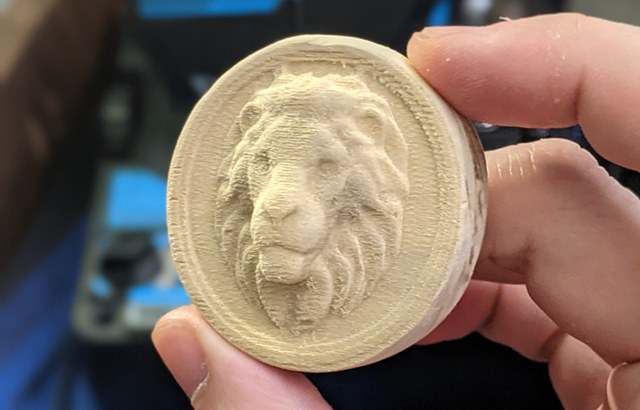
So how do you get started? Check out my video below. It covers how to download MeshCAM, activate your trial, where to download your first project STL, how to create your first tool, setup your stock, and create and export your tool paths.
Now, you may be wondering: How much does it cost? The current price for MeshCAM standard (no tool path simulation) is $250, and the MeshCAM Pro package (with tool path simulation) is at $500.
You may be used to slicing software being free. And that’s because it’s 100% necessary for the manufacturer to guarantee your success with the product. The difference there is that the manufacturer is in control of the tool being used to manufacture your projects and can therefore create a cost-effective software for that tool alone. Now imagine a manufacturer having to create software that works for every endmill bit and multiply that by all of the materials that you may want to use those tools on, in every way you may want to use them.
Despite there being free alternatives to MeshCAM, none of them I could find had all of the support, existing tutorials, or fully featured package that MeshCAM has, and as soon as you start looking at other paid alternatives, MeshCAM easily is the most cost-effective option.
I hope your venture into desktop machining is slightly easier and faster than mine! There is a whole lot to uncover even with this small 3018 machine!
- Alexander Courville on YouTube
- MeshCAM at GRZ Software
- SainSmart 3018 Prover CNC at Amazon
- I Bought a CNC Machine: I Have No Idea What I’m Doing