Using Tailscale and FreeNAS (or TrueNAS CORE) Together
Tailscale has been a recent fascination of mine and Pat’s recently. Tailscale is a secure, zero-configuration mesh network that just works. I’ve gushed enough about Tailscale in previous blogs that I’m going to work to avoid it here in this blog, but if you’d like–here are a few links where you can read more about what Pat and I have each done with Tailscale:
- Tailscale: A VPN that even Brian can use!
- Self-Hosting my own Cloud Storage: FreeNAS, Nextcloud, and Tailscale
- Making My Life Easier with Tailscale
- Self-Hosted Cloud Storage with Seafile, Tailscale, and a Raspberry Pi
Why another Tailscale blog, Brian?
At home, I’ve installed the Tailscale client on my OpenWRT router and I’m using Tailscale’s relay node feature to allow all of my Tailscale clients to access the entire subnet of my home network. It is simple solution that has worked well enough for me, but it might not work great for others.
If you’re a DIY NAS enthusiast and you’re not using an OpenWRT router, you’re going to have a difficult time recreating what I’ve personally done. Plus I could think of several scenarios where a NAS enthusiast might not want to expose their entire home network to their various Tailscale nodes like I have.
As a result, I wanted to follow up with a blog post that’d be simple to implement for FreeNAS users (and also TrueNAS CORE users, I assume) with the added benefit of narrowing the scope to only route traffic to the NAS. In my mind, the ideal scenario is having a Tailscale client running natively on each individual machine; narrowing the scope seems like a step towards that ideal.
Who knows, maybe I’ll go back and revisit how I’ve implemented Tailscale as a result of writing this blog!
Prerequisites
If you’re interested in following along with what I’ve done, then here are a couple things that you probably want to work through before getting started. They’re not technically required to get started, but I think you’ll find it helpful if you put the time in to make sure these steps are completed before you begin.
- Create an account with Tailscale
- Install the Tailscale client on a couple different machines–especially one that you are able to use outside of your own network. A mobile phone is a great device to test from or to use as a WiFi hotspot.
Create a bhyve Virtual Machine using Ubuntu 20.04.2.0 LTS (Focal Fossa)
 When I researched and wrote my blog about hosting my own cloud storage, I tried to find a way to run the Tailscale client natively on my DIY NAS running FreeNAS-11.2-U8. Between Tailscale not being officially supported on FreeBSD and FreeNAS discouraging you from tinkering with the core operating system, I found it too challenging to get Tailscale running on my NAS–even in a FreeBSD jail.
Previously I used the bhyve hypervisor within FreeNAS/TrueNAS CORE to work around these challenges. This was simple and straightforward enough that I opted to repeat it again for this blog. Within the FreeNAS web interface, I created the Virtual Machine running Ubuntu Server.
Note: Please see the FreeNAS documentation about creating a Virtual Machine and my blog about creating a virtual machine to self-host Nextcloud if you’re needing a more detailed step-by-step guide on creating a virtual machine.
- Virtual Machine Wizard Type: Virtual Machine (VM)
- Guest Operating System: Linux
- Name: tsrelay
- Boot Method: UEFI
- Start on Boot: Checked
- Enable VNC: Checked
- Virtual CPUs: 1
- Memory Size (MiB): 1024
- Create new disk image: Selected
- Select Disk Type: AHCI
- Size (GiB): 32
- Select zvol: <insert path on zvol for disk image to be stored>
- Adapter type: VirtIO
- Mac Address: default value
- Attach NIC: <select the primary NIC>
- Optional: Choose installation media image: <choose the path of Ubuntu 20.04 ISO>
After the VM was created, I powered on the Virtual Machine and began the Ubuntu 20.04 installation by using FreeNAS’s built-in VNC client. When installing Ubuntu Server, I pretty much accepted the default values and paged through each screen of the installation wizard. The only time I deviated from the default values was when I chose the option to install OpenSSH.
Instead of rebooting at the end of the Ubuntu installation, I powered the virtual machine off. I did this in order to remove the Virtual CD-ROM device from the Virtual Machine. After completing that, I powered the virtual machine back on and used the VNC client to ensure that I could log in as the machine’s root user.
Installing and Configuring Tailscale on the bhyve Virtual Machine
With the difficult part out of the way, the next two bits to complete are installing the Tailscale client and then configuring its relay node feature.
Tailscale Client Installation
The act of installing Tailscale on Ubuntu 20.04 LTS is incredibly easy. I am painfully aware that I keep saying things like this over and over in these blogs, but it really is that easy. I’m not trying to convince you all of anything, I’m mostly in awe at how simple it seems to be.
Relay Node Configuration
In order to use Tailscale’s Relay Node feature, you’ll first need to enable packet forwarding for both IPv4 and IPv6 on your relay node’s server:
- Execute
sudo nano /etc/sysctl.conf - Remove the ‘#’ in front of the line that reads
#net.ipv4.ip_forward=1 - Remove the ‘#’ in front of the line that reads
#net.ipv6.conf.all.forwarding=1 - Save your changes and exit (Control-X, Y, Enter)
- Execute
sudo sysctl -p
Once the packet forwarding is enabled on your VM, you should be able to follow along with Tailscale’s relay node documentation. I’ve gone ahead and summarized what I did here:
- Execute
sudo tailscale up --advertise-routes=<your-NAS-IP-address-goes-here>/32 - From Tailscale’s Admin Console:
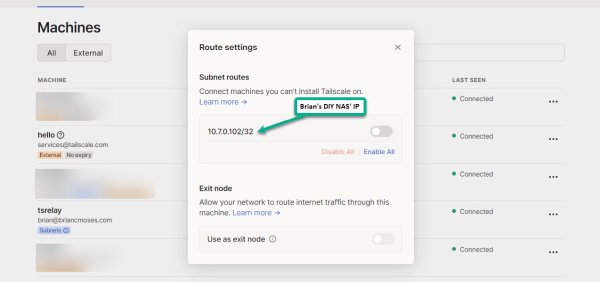
- Review and enable the Subnet Routes on the Tailscale Relay Node machine
- (Optional) Disable Key Expiry for the Tailscale Relay Node machine
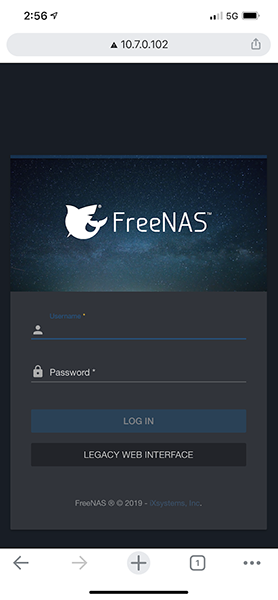
At this point, the Tailscale relay routes should be getting advertised to your other Tailscale clients. Assuming you have the Tailscale client installed and working on a mobile phone, it is simple to test by disabling your WiFi and then attempt to pull up your NAS’s web interface by punching its IP address into your mobile browser.
If your experience is anything like mine, you’ll be greeted by your NAS’s web interface!
Tailscale’s MagicDNS is currently in an open beta, which has worked quite well for me when resolving the names of machines which are exposed via my router’s relay node. In this case, the name resolution is managed by my OpenWRT router.
Here’s a video I published to accompany my first Tailscale blog. In the video, I access both administrative interface and the contents of a Samba share on my DIY NAS using the machine name (drteeth) while connected to using mobile phone and its data plan as a hotspot.
Conclusion
If you’re a FreeNAS (or TrueNAS CORE) user and you’re looking for an easy way to access your DIY NAS, then Tailscale is an awesome option that I can’t recommend enough. In fact, if you’re a NAS user of any kind, Tailscale should be considered if you’re interested in accessing your NAS from outside of your network. Unraid, QNAP, and Synology all have add-ons for Tailscale, and it is common these days for other NAS solutions to include some kind of hypervisor.
Moreover, Tailscale themselves seem very interested in how people are using Tailscale to access their data remotely. Tailscale recently surveyed and met with storage enthusiasts, and I leapt at the chance to video chat with Tailscale and share how I’ve been using Tailscale to access my own NAS. Recently, they released the Taildrop feature to beta testers which incorporates a method to easily send files between different Tailscale nodes.
I hope in the future we see a Tailscale plugin for FreeNAS and TrueNAS CORE, but in the meantime running a Tailscale relay node hosted on a small virtual machine via bhyve is both well-supported and simple to implement. At its, core the Tailscale relay node feature is a solution that can be hosted on as a virtual machine on a NAS or a homelab server, on a RaspberryPi 4, inside a Docker container, or even on an OpenWRT router.
Do you have a NAS at home that you want to access remotely? Does this blog make you want to try Tailscale? Or did you have a different method in mind? Let us know in the comments below!


